Replica Tape Reader to Measure and Record 2D/3D Surface Profile Parameters
The PosiTector RTR 3D is a digital spring micrometer that measures and records surface profile parameters using Testex Press-O-Film™ replica tape.
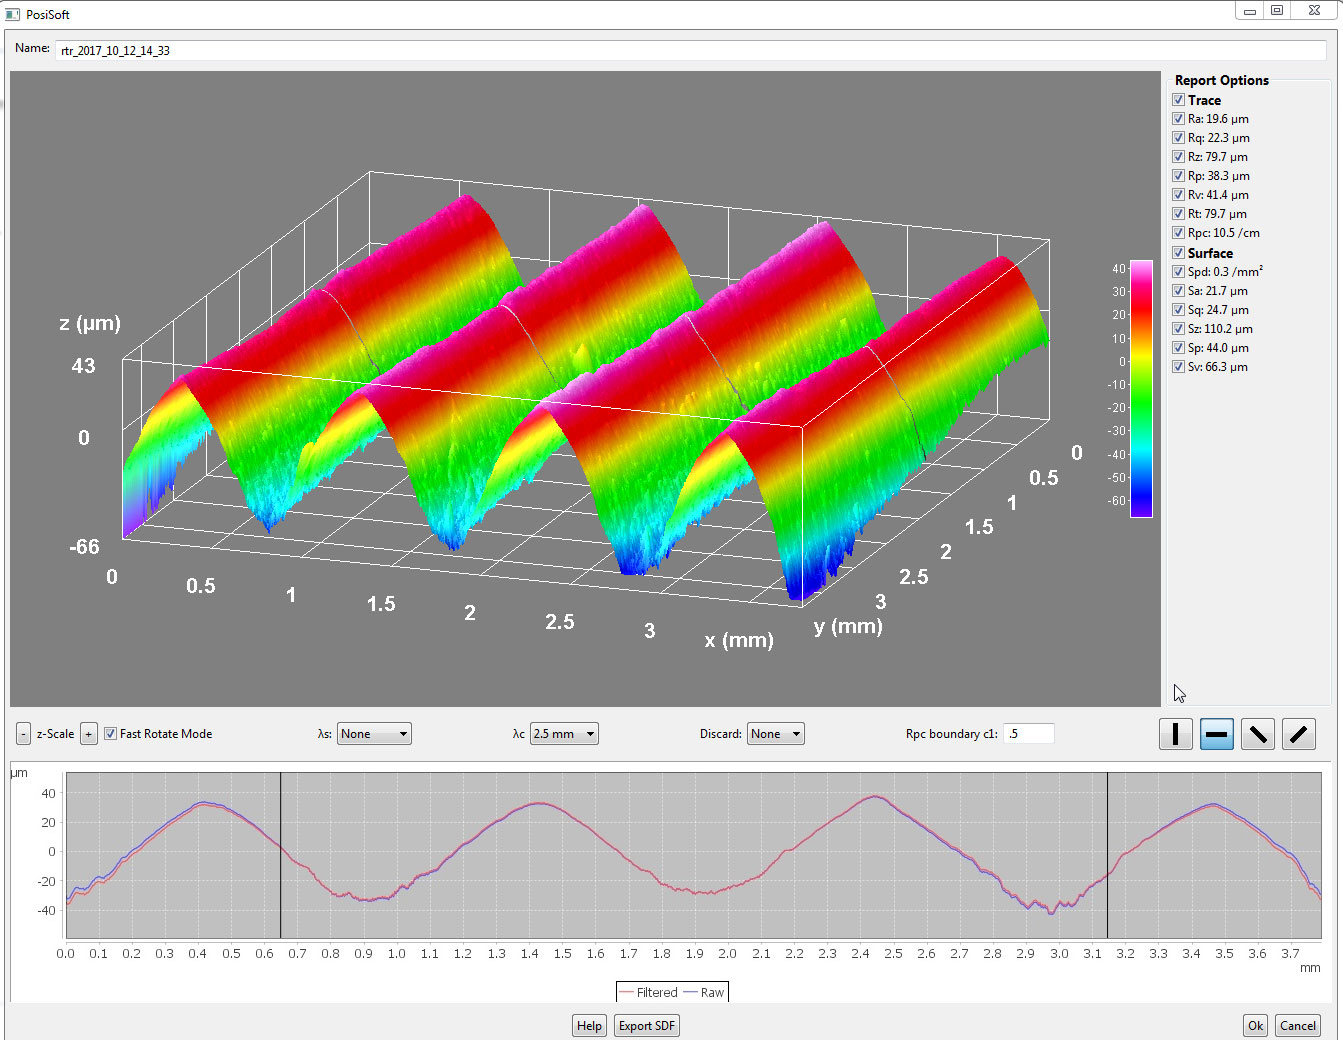
- Create a replica by burnishing tape on a surface and insert into instrument. 3D imagery and 2D/3D parameters are displayed in seconds!
- Reports common parameters: Ra, Rq, Rz, Rp, Rv, Rt, Rpc (2D), and Sa, Sq, Sz, Sp, Sv, and Spd (3D)
- Ideal for field or laboratory use; flat, curved or irregular surfaces
- Certified and traceable to an accredited national laboratory
- Download 3D .SDF image files for analysis in included PosiSoft or third party software
Simple
- Measures peak height (HL) and common 2D/3D profile parameters such as Ra, Rz, Sq, Spd, and more
- Ideal for measuring on flat, curved, or irregular surfaces
- NEW Larger 2.8″ impact resistant color touchscreen with redesigned keypad for quick menu navigation
- NEW On-gage help explains menu items at the touch of a button
- RESET feature instantly restores factory settings
Accurate
- Certificate of Calibration (containing Ra and Rt measurements) showing traceability to an accredited national laboratory included
- Conforms to national and international standards including ISO and ASTM
Powerful
- Calculates and records all fourteen 2D and 3D parameters (below) with each measurement
- NEW Screen Capture—save 100 screen images for record keeping and review
- NEW up to 30% longer battery life
- USB port for fast, simple connection to a PC and to supply continuous power. USB cable included
- PosiSoft USB Drive – stored readings and graphs can be accessed using universal PC/Mac web browsers or file explorers. No software required.
- Every stored measurement is date and time stamped
- Includes PosiSoft suite of software for viewing, analyzing & reporting data
- Apply short and long cutoff filters and discard lengths to optimize the analysis for a specific application
- Orient the 2D trace between horizontal, vertical, and diagonal (XY, YX)
Durable
- NEW Weatherpoof, dustproof, and water-resistant—IP65-rated enclosure
- NEW Ergonomic design with durable rubberized grip
- Rugged indoor/outdoor instrument—ideal for field or laboratory use
- Shock-absorbing, protective rubber holster for added impact resistance
Versatile
- PosiTector body accepts all PosiTector RTR, SPG, 6000, 200, DPM, IRT, SST, SHD, BHI, andUTG probes easily converting from a surface profile gage to a coating thickness gage, dew point meter, soluble salt tester, hardness tester, or ultrasonic wall thickness gage
- Selectable display languages
- NEW Auto rotating display with Flip Lock
- Mils/Microns switchable
How It Works

1 Prepare
Preparation of both the surface to be tested and the PosiTector RTR 3D are necessary before performing the test.
To prepare surface:
- Use cleaning putty to remove dust, debris, or residual blast media from the measurement site by firmly pressing the putty onto surface to be tested using your fingers and remove
To prepare the PosiTector RTR 3D:
- Clean anvils and camera lens using included cleaning card. Swipe card through opening a few times while firmly pressing both probe buttons to remove dust
- Zero probe and verify accuracy with included shim
- Ensure correct grade of replica tape is displayed in upper left hand corner of LCD

2 Burnish
Testex Press-O-Film™ replica tape consists of a layer of compressible foam affixed to an incompressible polyester film of highly uniform thickness. When pressed against a surface, the foam forms an impression, or reverse replica, of the surface. For best results when acquiring 2D/3D parameters and images from the PosiTector RTR 3D, it is recommended to use the supplied burnishing ball instead of the stainless-steel burnishing tool.
- Adhere the replica tape to the surface to be burnished.
- Holding the ball in two hands using your index fingers and thumbs, place the ball on the replica tape.
- Gently roll the ball over the tape while viewing the burnished tape through the clear ball. Adjust the force applied to the ball until a replica of the surface begins to appear on the tape.
- Continue to roll the ball until the tape is completely burnished (at least 30 seconds).

3 Measure
After placing the compressed tape (replica) into the PosiTector RTR 3D a light-intensity versus thickness algorithm is used to produce a three dimensional (3D) image of the replicated surface.
- Insert the burnished replica tape into the measurement opening. Ensure the tape is properly positioned so that the burnished region is centered within the opening in the probe with the adhesive (sticky) side down.
- To position the tape, move the Testex™ Press-O-Film™ replica tape to the back of the probe and align the two dots (printed on replica tape) with arrows on both sides of the measurement opening.
- Once positioned, firmly press both probe buttons simultaneously and hold until the PosiTector RTR 3D beeps and the measurement is displayed.